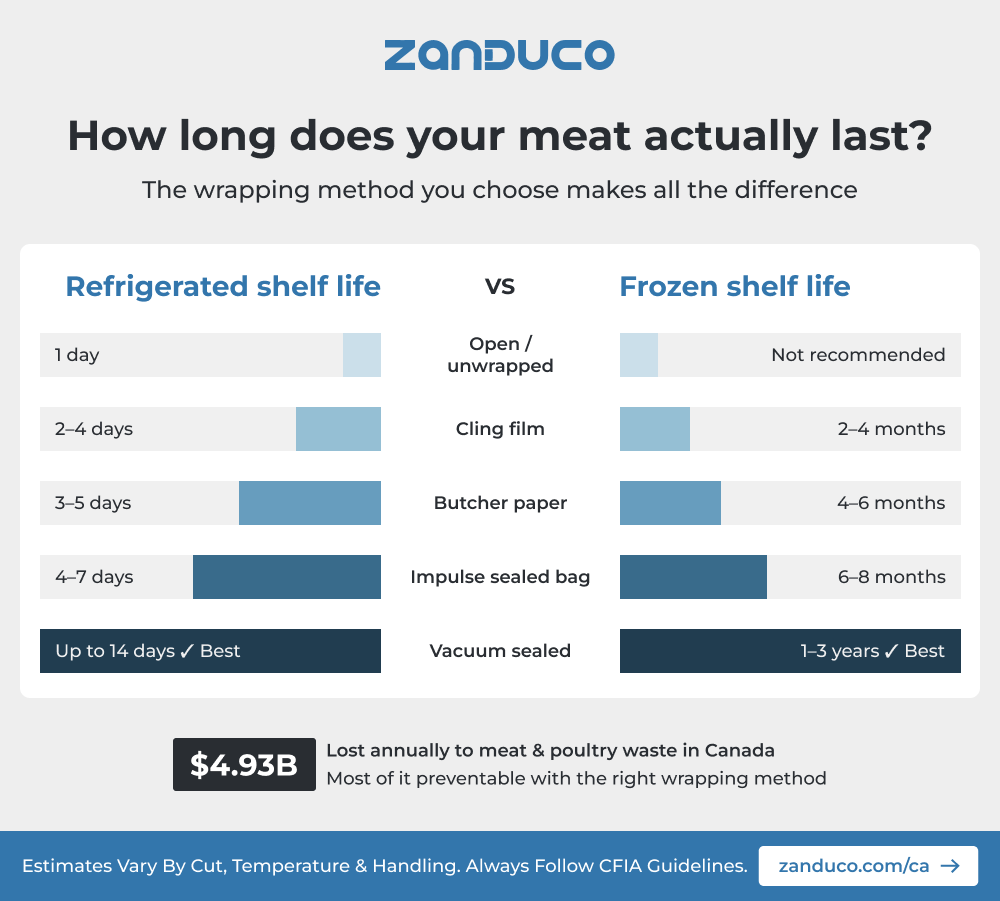
According to a 2024 report by Second Harvest and Value Chain Management International, Canadian meat and poultry waste alone amounts to 0.38 million tonnes annually, valued at nearly $4.93 billion CAD lost across the supply chain every year. For individual butcher shops, restaurants, and deli operators, that national number hits close to home every time a poorly wrapped cut gets freezer burn, spoils before service, or gets pulled from the display counter ahead of schedule.
The good news? Most of that loss is preventable and it starts with how you wrap your meat.
This guide walks you through every commercial meat wrapping method used in Canadian kitchens today, step by step, so you stop losing product and start protecting your bottom line.
Why Meat Wrapping Is a Business Decision, Not Just a Kitchen Task
Most operators think of meat wrapping as a routine kitchen task. It isn't. It's a direct driver of food cost, food safety compliance, and customer presentation, three things that affect your revenue every single day.
Improper wrapping leads to freezer burn, bacterial contamination, moisture loss, and premature spoilage. In a commercial setting governed by CFIA food safety standards, it can also mean failed inspections and costly write-offs. Done right, proper meat wrapping extends shelf life, maintains quality, protects your margins, and keeps your display counter looking professional.
Know Your Wrapping Method Before You Touch the Meat
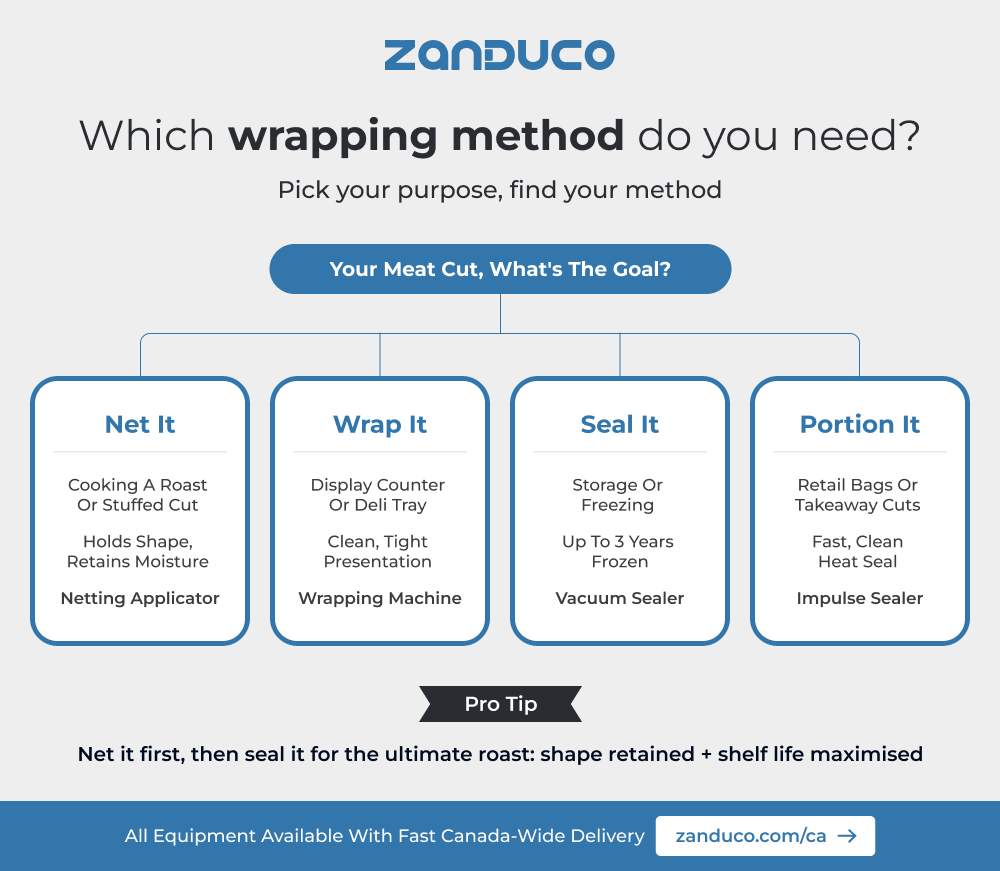
Not all wrapping methods work for every cut or every purpose. Choosing the wrong one is where most kitchens quietly lose money. Here's a clean breakdown of the four main commercial methods used in Canadian food businesses:
|
Method |
Best Used For |
Equipment |
|
Beef / Meat Netting |
Roasts, stuffed cuts, shaped meats, poultry |
|
|
Stretch / Cling Film Wrapping |
Display counter, deli trays, short-term retail |
|
|
Vacuum Sealing |
Freezing, long-term storage, sous vide prep |
|
|
Impulse / Heat Sealing |
Pre-portioned retail bags, takeaway cuts |
Pick the method that matches the job, then follow the steps below.
Step-by-Step: How to Wrap Meat the Right Way
Step 1 - Net It: Roasts, Stuffed Cuts & Shaped Meats
Beef netting is the professional standard for any cut that needs to hold its shape during cooking like whole roasts, stuffed chicken breasts, pork loin roulades, and boneless tied cuts. It applies even pressure across the meat as it cooks, retaining moisture and delivering a consistent, professional finish that twine simply can't match.
How to apply beef netting:
-
Select the correct applicator tube size i.e. 3.4" for smaller cuts like stuffed chicken, up to 5.6" for large beef roasts
-
Load the netting onto the applicator tube
-
Push the meat through the tube so the netting sits evenly over the cut
-
Secure both ends and trim any excess netting
Pro tip: Net your roasts before vacuum sealing for the cleanest retail-ready presentation, the netting holds shape in the bag and goes straight from freezer to oven.
Step 2 - Wrap It: Display Counter & Short-Term Retail
For cuts going directly into your display counter or deli tray, a commercial wrapping machine is the professional standard. It delivers a tight, clean, transparent wrap that presents the product well and keeps surface moisture controlled.
Choose between a one-roll wrapping machine for lower-volume operations or a two-roll wrapping machine for high-volume butcher shops and deli counters processing multiple cuts simultaneously.
Key technique tips:
Always wrap at refrigerated temperature, never wrap warm meat
Pull the film tight with zero air pockets
Label every tray with the cut name, weight, and wrap date
Rotate display stock first-in, first-out (FIFO) without exception
Step 3 - Seal It: Long-Term Storage & Freezing
Vacuum sealing is the non-negotiable gold standard for commercial meat storage in Canada. Removing all air from the package dramatically slows bacterial growth, eliminates freezer burn, and extends shelf life far beyond any other wrapping method.
Shelf life comparison:
|
Storage Method |
Refrigerated |
Frozen |
|
Cling wrap / tray |
2–4 days |
2–4 months |
|
Butcher paper |
3–5 days |
4–6 months |
|
Vacuum sealed |
up to 2 weeks |
1–3 years |
Use embossed vac pac bags for wet-brined, marinated, or textured cuts as the embossed channels ensure an even, complete seal every time. Standard vac pac bags work perfectly for smooth, dry-aged, or fresh cuts.
Pro tip: Always label vacuum-sealed packages with the cut, weight, and date sealed, this is CFIA best practice and keeps your inventory audit-ready at all times.
Step 4 - Portion It: Retail Bags & Takeaway Cuts
For pre-portioned retail cuts and takeaway packaging, an impulse sealer is faster and more cost-effective than a full vacuum machine. It heat-seals pre-filled bags cleanly and quickly which is ideal for high-volume deli counters and butcher shops doing retail portioning throughout the day.
Choose your seal bar size based on your portion width, from an 8" bar for small portions right up to a 20" bar for larger retail cuts. The right size makes a real difference in throughput speed during peak hours.
5 Pro Tips Every Canadian Meat Business Should Follow
These are the habits that separate professional operations from costly, inconsistent ones:
-
Never wrap warm meat, always chill to safe temperature first before wrapping or sealing
-
Label everything with cut, weight, and date on every single package (CFIA best practice)
-
Use embossed vac pac bags for marinated or wet-brined cuts to guarantee a complete seal
-
Net before vacuum sealing for display-ready roasts as it holds shape and speeds up service
-
Clean all wrapping equipment daily, as residue and cross-contamination are real compliance risks in commercial kitchens
Conclusion
The difference between a profitable meat operation and one that bleeds money through spoilage often comes down to one thing - how consistently and correctly you wrap. Whether you're running a busy butcher counter, a restaurant kitchen, or a deli operation, the right wrapping method for every cut is not optional, it's foundational.
Net your roasts for shape and moisture. Wrap your display cuts for presentation. Vacuum seal your storage stock for maximum shelf life. Portion your retail cuts for speed and consistency. Get those four steps right, with the right equipment behind them, and the savings add up fast.
"Your Meat Is Only as Good as How You Protect It! Let's Fix That"
Zanduco carries everything Canadian butchers, chefs, and deli operators need to wrap meat professionally, from roast beef tyer netting and applicator tubes to commercial wrapping machines, vacuum packaging machines, vac pac bags, and impulse sealers, all in one place, with fast delivery across Canada.